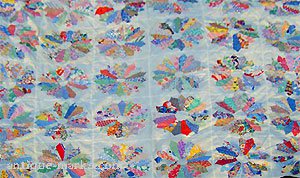
Your essential guide to caring for heirloom and other antique quilts. The much loved quilt that's often handed down from generation to generation, which makes the care and repair of your antique quilt a prime concern.
Contents
Beautiful antique quilts, also known as heirloom quilts and coverlets are often passed down through generations in a family.
Our heirloom quilts give us a sense of our family heritage and can evoke cherished memories. You may have inherited a family quilt that has seen generations of use and love, or picked up worn antique quilts at a rummage sale or auction
So you will be pleased to know that it is possible to restore well-worn antique quilts so they can still be used and admired for years to come. Antique Quilts that have strong sentimental value or are if historical significance should be taken to a quilting professional for restoration or conservation.
If you don't possess basic sewing skills now is not the time to learn. Perfect your basic skills on inexpensive muslin or cast-off clothing scraps before attempting to repair antique quilts yourself.
Tips & Advice on Caring for Heirloom and Antique Quilts
A quilt that has been well-loved may have seams that are coming apart, rips or tears where the batting may show through, dirt and stains, or missing pieces of fabric.
Seams that are coming loose can be easily repaired by turning the raw edges under and using a whip stitch to tack the edges down.
Check for areas of stress on other parts of the quilt before beginning, since repairing one seam may cause another to come loose.
- A torn spot can be easily repaired by using Fine Fuse, a fusible web.
- Slip a piece of Fine Fuse under the torn spot and gently bring the edges together. Touch the spot with the tip of a hot iron to melt the web and stabilize the tear. Practice the technique on muslin first, since it is a permanent bond and cannot be undone.
- When a small section of the quilt is missing or damaged, you may be able to replace it with vintage fabric or a modern reproduction
- Match the new piece according to the color and hue of the original fabric, and don’t worry so much about matching the pattern exactly. Cut the new section to match the seam lines, and applique the new piece on top of the damaged section.
- For quilts with larger sections that are missing or damaged, you may be able to use part of the original quilt.
- For instance, you may be able to remove the last row of blocks to replace damaged blocks in other sections. It will be necessary to rebind the seam at the end with this method.This may turn your quilt into a wall hanging, but it’s better than letting a beautiful antique quilt languish in a drawer because it isn’t presentable. When the binding is replaced, keep it authentic. Straight edge binding was normally used in quilts before 1900; bias binding was used afterwards.
Badly frayed areas may be covered with a sheer fabric to make the quilt serviceable again. Tulle and chiffon are inexpensive alternatives to silk crepeline or Stabiltex often used by professional quilt restoration services.
- For instance, you may be able to remove the last row of blocks to replace damaged blocks in other sections. It will be necessary to rebind the seam at the end with this method.This may turn your quilt into a wall hanging, but it’s better than letting a beautiful antique quilt languish in a drawer because it isn’t presentable. When the binding is replaced, keep it authentic. Straight edge binding was normally used in quilts before 1900; bias binding was used afterwards.
The Batting, that's the fill between the top and back of the quilt, may need to be replaced.
- Again, keep it authentic, and use a high-quality cotton batting (not polyester) to replace the original antique batting.
- It will be necessary to remove the original quilting stitches (the stitches that hold the front and back together) and replace them.
- If you're not a quilter yourself, you may want to ask a quilt shop or other experienced quilter to replace the batting for you
Cleaning Antique Quilts ...
Don't wash your quilt before beginning the repairs, unless it is absolutely filthy.
- Antique fabrics require delicate handling, and washing antique quilts can cause raw edges to fray badly enough that they can’t be stitched.
- You may be able to vacuum loose dirt and dust off the quilt.
- Lay the quilt on a flat surface and place a fiberglass screen over the area to be vacuumed. Be sure to tape the edges of the screen so the exposed edges don’t snag the quilt. The screen will allow the vacuum to suck up dirt without raising the fibers.
- Using the brush attachment and the lowest power setting, run the brush lightly over the screen. Vacuum the entire front of the quilt, and then turn it over and do the back. Vacuuming is often adequate to make the quilt presentable.
- Antique Quilts that aren't dirty enough to require washing, but merely have a musty odor, can be freshened up by hanging them outdoors on a breezy day.
- Keep the quilt out of the direct sunlight, which can fade the colors quickly. Place a clean sheet over a wide railing and lay the quilt on top.
- Never use a clothesline or other narrow edge to hang a quilt, which can cause stress and damage to the fabric.
- Never dry-clean an antique quilt. Dry cleaners use strong chemical solutions that may damage antique fabric, especially if it is silk or wool.
- Cotton quilts may be wet washed if absolutely necessary, but test the fabric first to see if the colors are going to run.
- Antique quilts were often made with home-made dyes which are unstable and run or fade easily.
- Rub the surface of each different fabric with a dry Q-tip. If the color comes off, the dye is definitely going to run.
- If the fabric passes the dry test, try it with a moistened Q-tip. If color comes off, it is possible that the dye will run. It’s best to leave the cleaning to an expert.
Washable Antique Quilts ...
If you've determined that the fabric and batting are washable and the colors won't run, then you can wet wash your antique quilts in the bathtub.
Run four to five inches of cool or tepid water into the tub and add a mild detergent such as Liquid Ivory or Orvas.
- Orvas is a very gentle detergent that is pure sodium lauryl sulfate.
- It is sold in quilt shops as Quilt Soap, but can also be found at livestock supply stores.
Lay the quilt on top of a fiberglass screen which has been placed on top of the water. Sweater drying screens work well for this step.
Pat the water through the quilt, don’t wring or agitate the fabric, and don’t let it soak. You may want to use a dye mop, as an added precaution, to absorb any color that does happen to leach out of the fabric. Rinse the quilt thoroughly in cool water until the water runs through clear and no suds remain.
Press the water out of the quilt, and blot it with a towel. Lift the quilt out of the tub on the screen, since the fabric will be even more delicate when it is wet. Lay the quilt flat to dry on a sheet.
- Drying the quilt indoors on the floor is best if you have room. Direct a fan toward the quilt to help it dry more quickly.
- Outdoors will work if you can keep the quilt out of the sun. Lay a clean light sheet over it to keep nasty things from falling on it out of the sky. Once the top feels dry, flip the quilt over and let the back dry.
If you don’t have a screen handy, you can put the quilt directly in the tub. The purpose of the screen is to hold the quilt out of the water so any dyes that run don’t settle back in the fabric, and to give you a way to lift the quilt.
When removing the quilt from the bottom of the tub, don’t grab it by the corners or edge! Remember to always handle antique quilts very carefully when they are wet. Use your forearms to lift a wet quilt, supporting as much of its weight as possible.
Although hand washing is strongly recommended, antique quilts that are in good condition and made of washable fabrics and battings can be machine washed.
But do so at your own risk; there is no guarantee the quilt will come out of the washer in as good a condition as it went in.
- Getting wrapped around the agitator can cause seams to open and delicate fabric to tear.
- Only you can decide if you want to risk your beautiful heirloom quilt to save the effort of hand washing.
If you’re determined to wash your quilt in the washing machine, use a large washing machine on a gentle cycle at the highest water level. Choose a detergent that does not contain fragrances or other additives, and don’t use products meant for washing delicate woolens. Chemicals in these products can turn antique cotton fabrics yellowish.
Remove the quilt as soon as the machine finishes the rinse cycle to prevent any color bleeding. Tumble it in the dryer on a cool setting.
Storing your antique quilts properly when not being displayed
To prevent any further deterioration only clean your heirloom quilt, if it truly needs cleaning, before storing it.
- Untreated wood and cardboard can emit chemicals that cause antique fabric to break down.
- Excessive light, either natural or artificial, can fade the fibers.
- Don’t store antique quilts in a plastic tub. Roll your quilt in acid-free paper and store it in an acid-free box or tube to prevent undue deterioration. Keep the box in a cool, dry spot, and be sure the quilt itself is absolutely dry so mold and mildew don’t cause permanent stains.
- Every few months, take the quilt out of storage and refold it along different lines, or you may end up with permanent creases.
Once your antique quilts have been cleaned and restored, it’s a good idea to document what you have done.
Iron a piece of muslin to a piece of freezer paper (both cut to 8-½" x 11"), and use your typewriter or laser printer to print the information, or use indelible ink to write the information on the muslin by hand.
- Include information about the origin of the quilt, even if it’s only to state that you found it at a rummage sale.
- Document any repairs you have made, and any other pertinent information.
- Peel the fabric label from the paper and hand stitch it carefully onto the back of the quilt.
You could even make a pocket from the label to hold other important papers relating to the genealogy of the quilt, the family relationships and any other history.
Repairing damaged antique quilts can be a rewarding, but painstaking, process.
Before beginning the attempt decide whether you have the time, patience and skill to make the effort.
If you don’t have the confidence for the project, perhaps it is best left to professionals to restore your quilt.
Professional restoration includes cleaning and repairing the quilt so that it is in a useable condition. There will be no apparent rips or worn areas, although the quilt may not be returned to its original condition.
The professional reperair may suggest conserving a badly damaged antique quilt if it has historical significance.
Conservation stabilizes the condition of the quilt, so that more damage doesn’t occur, but no repairs are made that can’t be undone.
Even the oldest most badly stained and damaged quilt can have great sentimental value ... Those tears and stains may bring back memories of curling up in front of the TV with the family quilt to keep you cozy, or jumping on Grandma’s quilt-covered bed as a child. Professional conservation can help you keep that beloved, though perhaps unsightly, heirloom quilt for future family generations to enjoy.

